Do you want to know how to enable iMessage on your iPhone, iPad, or Mac computer? Are you wondering what is iMessage, and what is the difference between it and an SMS (text message)? In this guide, we'll cover that, enabling iMessage, why you should use iMessage, customizing iMessage, and using iMessage on your Mac. If you follow these steps and get an iMessage waiting for activation error notification, we have a troubleshooting guide to get your iMessages activated and working. As a final note, if you came to this article because an iMessage was not delivered, or was sent as a text message instead, we have the answer to how to know if someone blocked your number.
Related: How to Search Your iPad & iPhone Messages: iMessage, Facebook & WhatsApp
Jump To:
- What's the Difference Between an iMessage & Text Message?
- Why You Should Use iMessage
- How to Enable iMessage on an iPhone or iPad
- How to Turn On iMessages on a Mac
- How to Turn Off iMessages on a Mac
What's the Difference Between an iMessage & SMS (Text Message)?
- What is an SMS message? SMS stands for "Short Message Service," which in common parlance we just call text messages. Text messages are sent through your cellular service provider (Verizon, AT&T, T-Mobile, etc.) as part of your text messaging plan.
- iMessage is Apple's messaging service and iMessages can only be sent between iMessage users.
- iMessages are sent over the internet. If you aren’t connected to Wi-Fi, the message will count toward your monthly data plan. But if you are connected to Wi-Fi, the iMessage will be sent freely and won't count towards your data plan.
- Since you can send iMessages using Wi-Fi alone, you can also send iMessages from your iPad or Mac.
- You can visually recognize the difference between an SMS (text message) and an iMessage by the color of the message bubble. iMessages send as blue while text messages send as green.
Why You Should Use iMessage
iMessage is the best way to communicate with other iPhone users for a couple of reasons. First, as we discussed in the above section, you can save on data when you iMessage, as long as you are connected to Wi-Fi. Whenever you are home, or at a cafe, or anywhere else with a Wi-Fi connection, your iMessages will send over the internet connection, unlike text messages, which use your text messaging plan.
Another reason you should enable iMessage is that you'll be able to send and receive messages across multiple platforms. When you enable iMessage on your iPhone, iPad, and Mac, you can check your conversations with other iPhone users from any of your devices, so if you're chatting with a friend and your phone dies, you can just continue the conversation on your Mac. We'll go over how to enable iMessage on all these devices, so you can start taking advantage of these perks. (You can also get SMS messages on your Mac if you have OS X Yosemite or later.)
How to Enable iMessage on Your iPhone or iPad
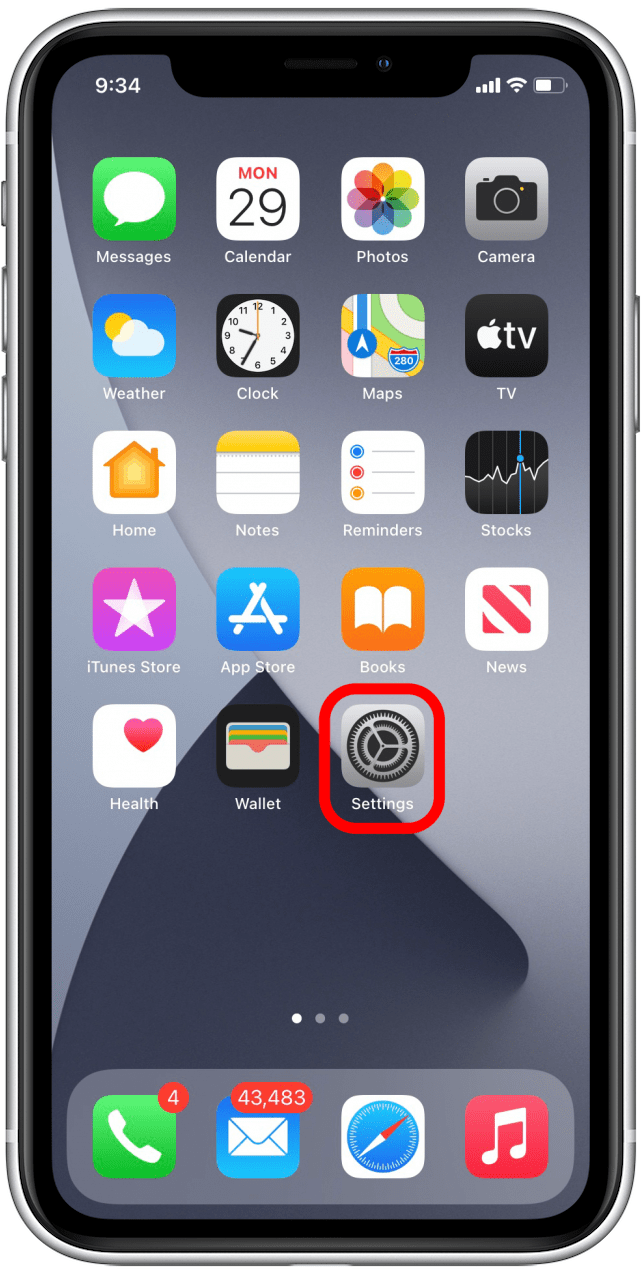
- Open the Settings app.
![Settings]()
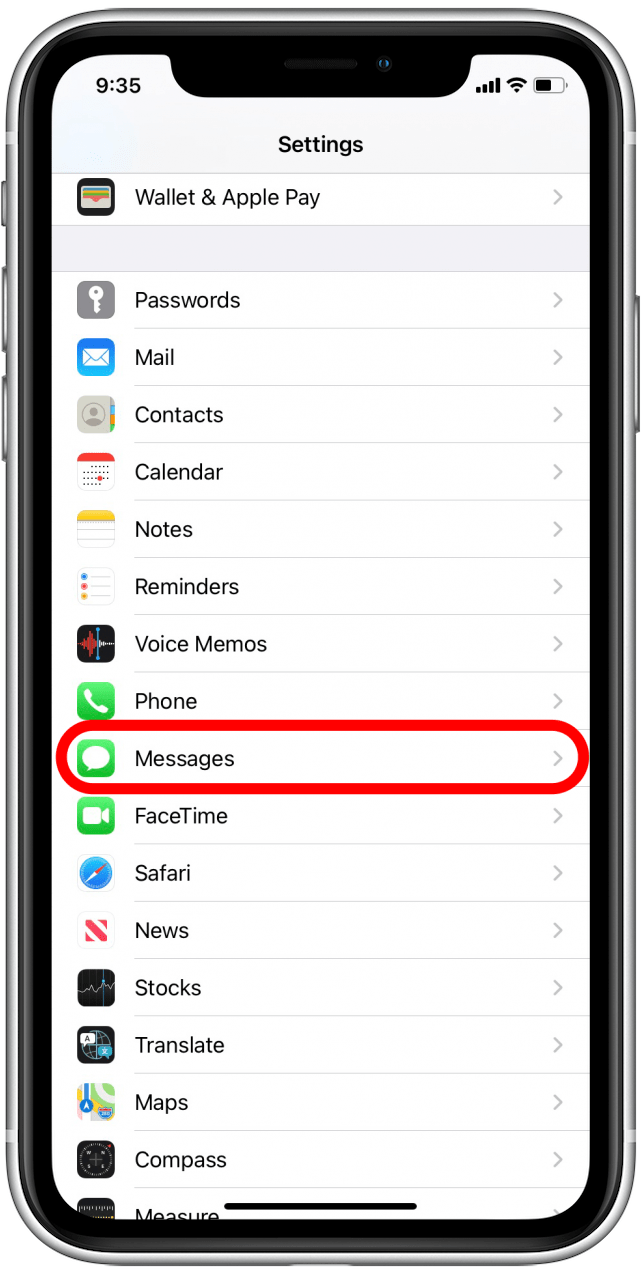
- Tap Messages.
![Messages]()
- Toggle on iMessage.
![Turn iMessage on]()
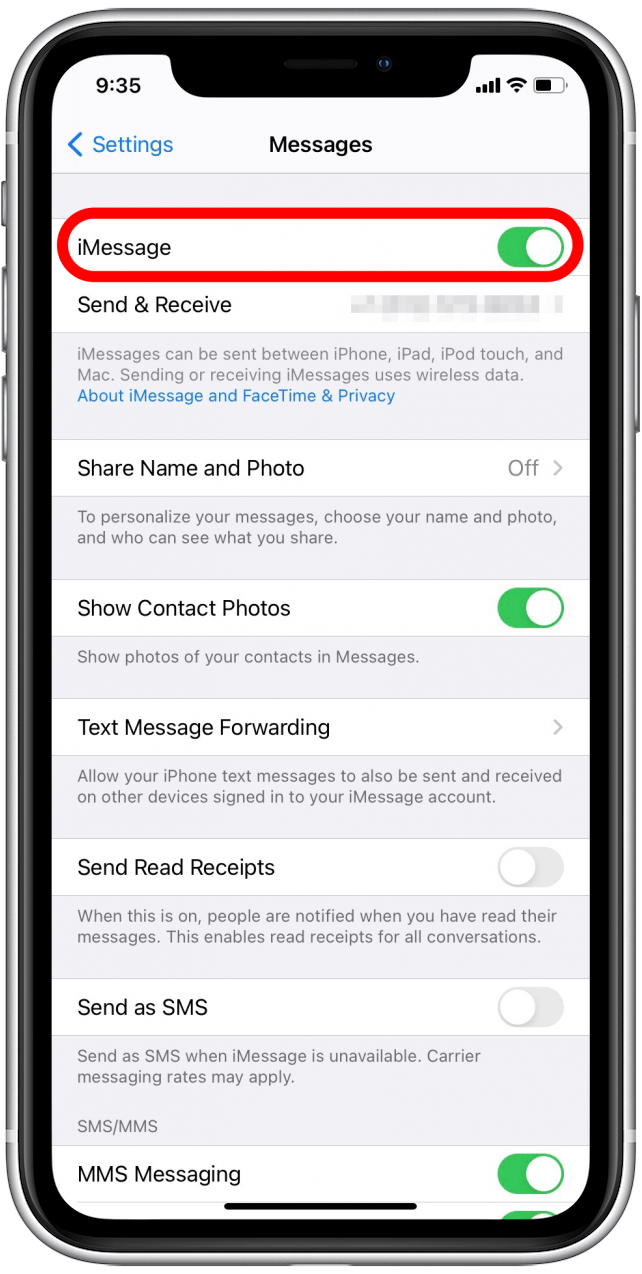
You’re ready to begin sending iMessages to other friends on their iPhone, iPad, or Mac. You’ll know you’ve successfully sent an iMessage if your outgoing message is blue.
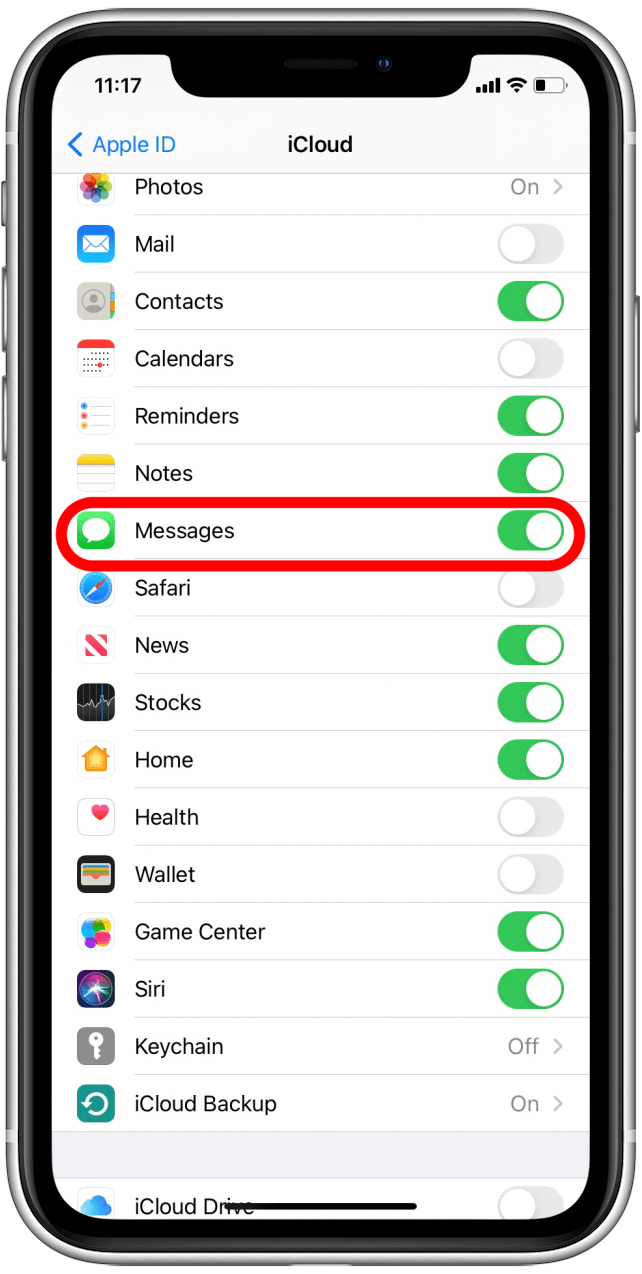
Use iCloud with Messages
A good way to help free up space on your iPhone without losing any of your iMessage or text conversations is to enable iCloud for Messages. When you enable iCloud for Messages, all messages you send and receive are saved to your iCloud. This also means that you can access all your conversation when you sign into another device with Messages in iCloud turned on using your Apple ID. Here's how to take advantage of this feature:
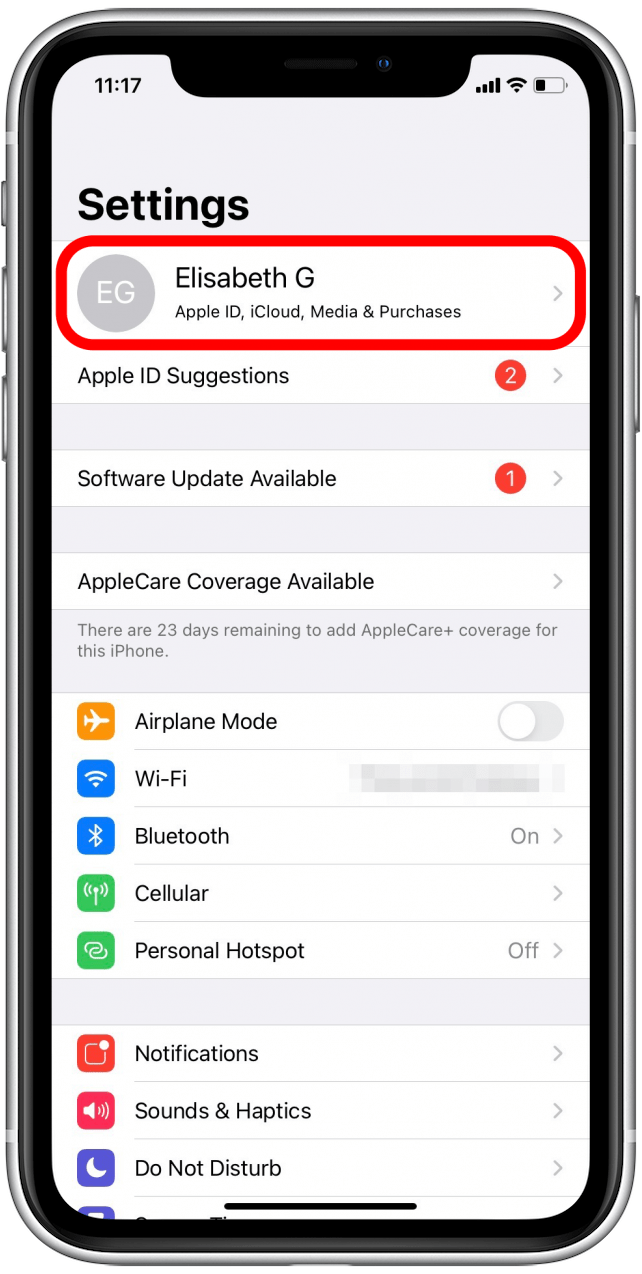
- Open Settings.
![Settings]()
- Tap your name.
![Tap your name]()
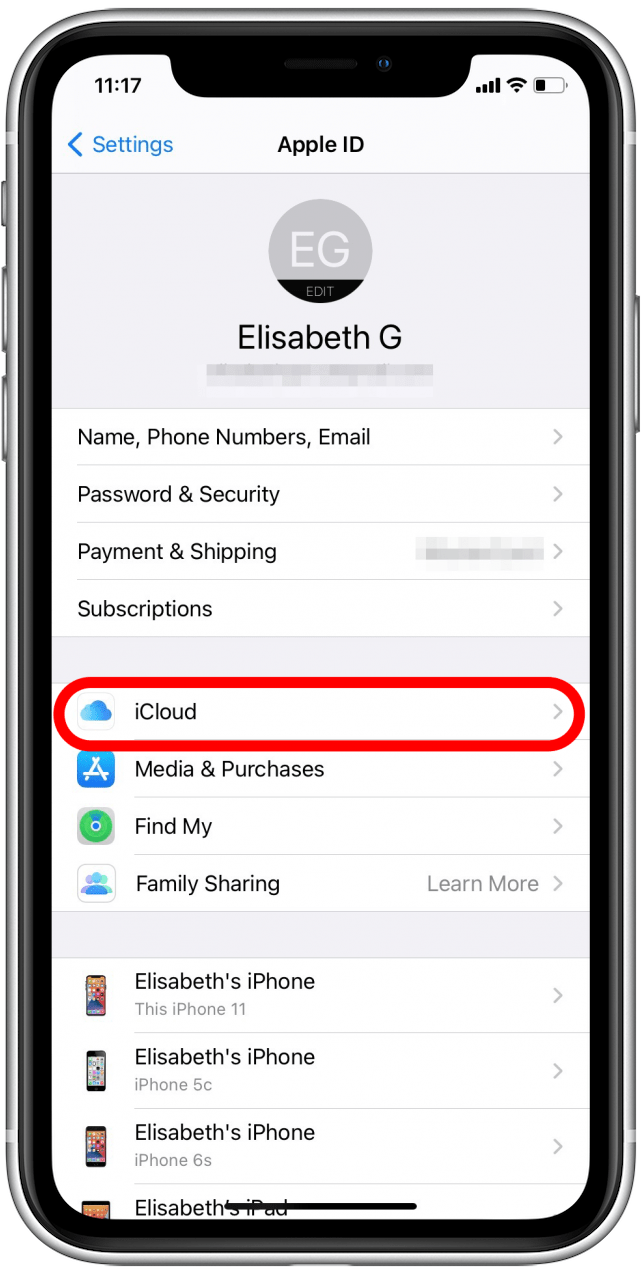
- Tape iCloud.
![Tap iCloud]()
- Toggle Messages on.
![iCloud with Messages]()
How to Turn On iMessage on a Mac
Last but not least, you can get your iPhone messages on your Mac, thanks to iMessage. Skip to how to turn iMessages on Mac off if you’re having the opposite problem. Otherwise, here's how to enable iMessage on your Mac:
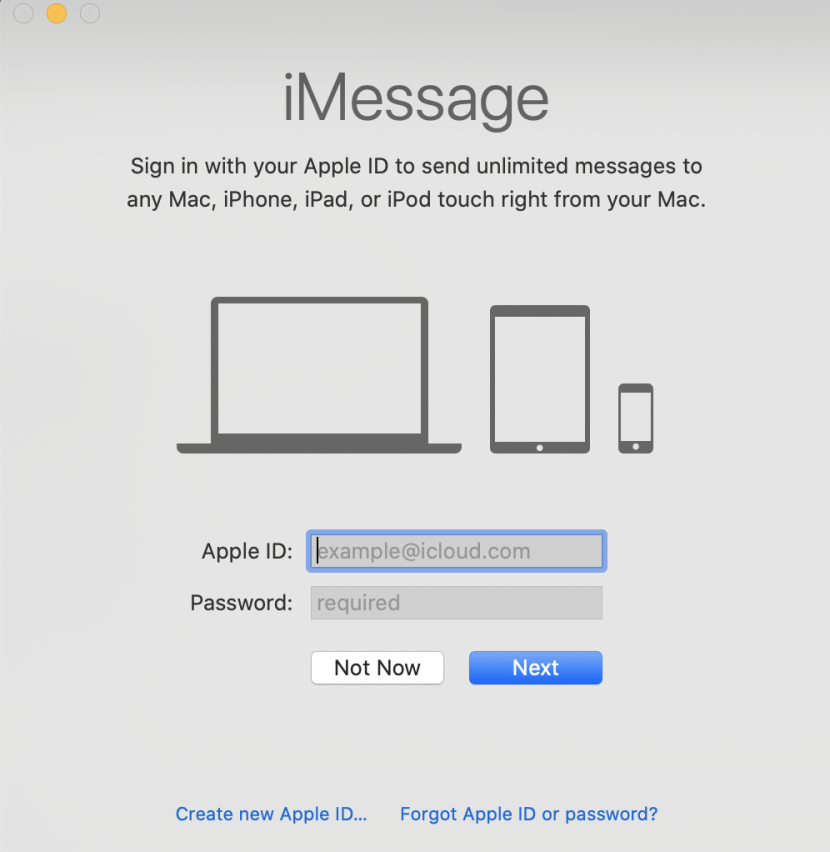
- You must be connected to Wi-Fi for iMessages to work on your Mac. Open the Messages app on your Mac.
![mac messages app]()
- If you're not already signed in, a window will pop up so you can sign in with your Apple ID and password.
![sign in with your apple id and password]()
- We have an article to help you out if you forgot your Apple ID password or Apple ID.
- Now you're ready to start sending iMessages from your Mac.
If iMessage is not working on Mac, read these tips to troubleshoot the issue!
Customize iMessage on Mac
There are several ways you can customize your Messages app to get the most of our iMessages on your Mac.
Use iCloud with Messages
Like on your iPhone, you can turn on Messages in iCloud on your Mac, so that all your conversations are saved and updated across all enabled devices. Here's how:
- With the Messages app open on your Mac, click Messages.
- Click Preferences in the drop-down list.
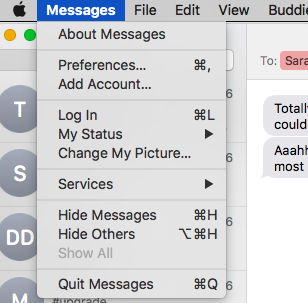
- Click iMessage.
- Select Enable Messages in iCloud.
Set Up Name & Photo Sharing
On your Mac, you can set a name and photo that you want other users to see when you send messages to them from the Messages app on your Mac. Here's how:
- In the Preferences pop-up, click General.
- Select Set up Name and Photo Sharing and follow the on-screen instructions.
Set Your Email Address & Phone Number
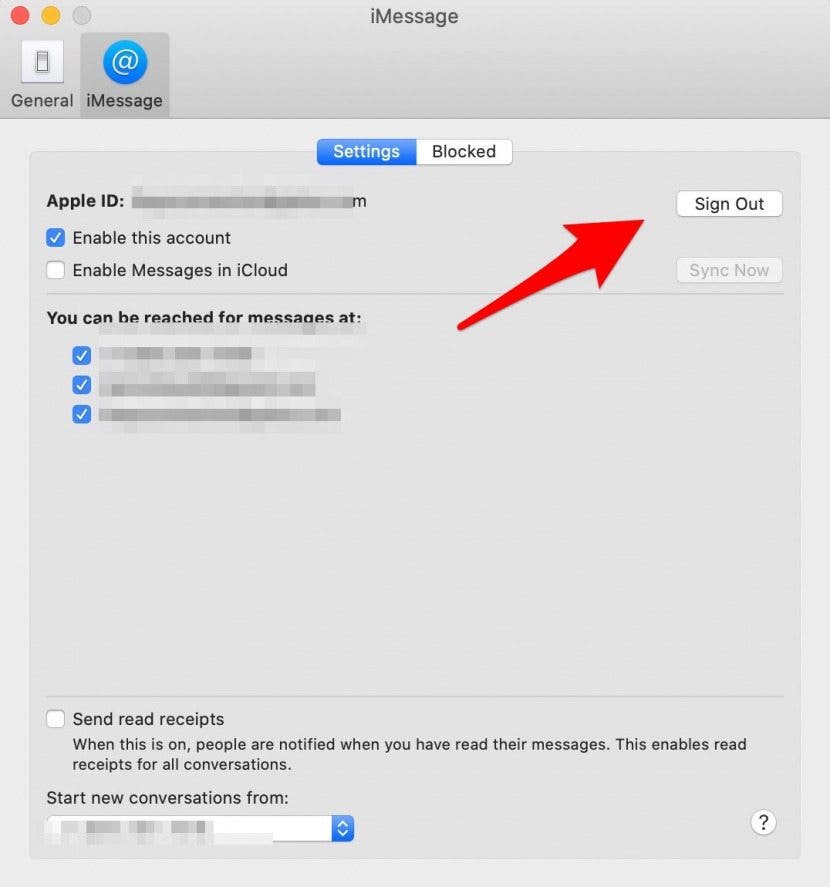
From the Preferences pop-up, find the heading "You can be reached for messages at." Select the phone number and email address you're reachable at. If more than one email address or phone number is selected, you can also select which email address or phone number new conversations will originate from by selecting them under "Start new conversations from."
Send Read Receipts
In the Preferences pop-up, you will see a box at the bottom labeled "Send read receipts." When you click this box, others will be able to see when you have read, but not yet responded to, messages they sent you.
How to Turn Off iMessages on a Mac
If you need to disable iMessages on your Mac for any reason (perhaps your friends keep distracting you while you're trying to get some work done), here's how:
- With the Messages app open, at the very top menu bar, click Messages.
- Choose Preferences from the drop-down list.
- Click Accounts.
- Find your Apple ID on the list with the iMessage icon. Click on it.
- Uncheck Enable this account or select Sign Out.
![turn off imessage mac]()
- Doing so will log you out of iMessages. Close the app, and you’re done; you will no longer receive iMessage notifications on your Mac.