


iPad
Far from being a glorified iPhone or smaller Mac, your iPad is a unique device offering unique functionality. Below, we’ve compiled our favorite iPad tips and shortcuts to help you make the most of your device. We’ll cover handy iPad-specific gestures, typing tricks, hidden multitasking features, drawing tips, and more.
What Are the Different iPad Models?
If you want to find your exact model, generation, or serial number, or just learn more about your tablet, check out our article on how to identify your iPad.
Pro Tip: The easiest way to view your iPad model, generation, or software version is to open the Settings app, tap General, and tap About. On this screen, iPadOS Version lists your current software, and Model Name displays the iPad model and generation.
Should You Buy a Cellular iPad?
When you’re buying an iPad, you have the option to purchase an iPad with both Wi-Fi and cellular connectivity (instead of just Wi-Fi). iPads with the added cellular connectivity are great, but the downside is that they cost extra and will require a monthly data plan from your carrier. So unless you frequently need online access when you’re out of Wi-Fi range, a cellular iPad is probably unnecessary.
However, if your iPad is your sole mobile device, having a cellular model could be really valuable for going online when you don’t have access to Wi-Fi, but need to get directions or make calls using FaceTime or third-party apps (cellular plans cover data only, not talk or SMS).
Use Hotspot as a Money-Saving Workaround
If you have an iPhone, you can enable a Personal Wi-Fi Hotspot to share the internet connection with your iPad. While using a Hotspot will more quickly deplete your iPhone’s battery, it’s a great solution if you have an unlimited data plan for your iPhone and want to avoid that extra monthly charge!
iPad-Only Gestures
Many common iPhone gestures can also be used on your iPad. For example, on both devices, you can swipe up from the bottom of the screen to close an open app. But here, we’re focusing on some iPad-only gestures that make use of the iPad’s specific functionality.
Return to the Home Screen
If you have an app open, try the five-finger pinch as an alternate way to return to your Home Screen. Start by spreading your hand out and touching all your fingers to the screen, then narrow them together to a point. The app will close and you’ll be taken straight to your Home Screen. 
Switch Between Apps
If you want to switch between applications quickly, there are a couple of gestures you can use:
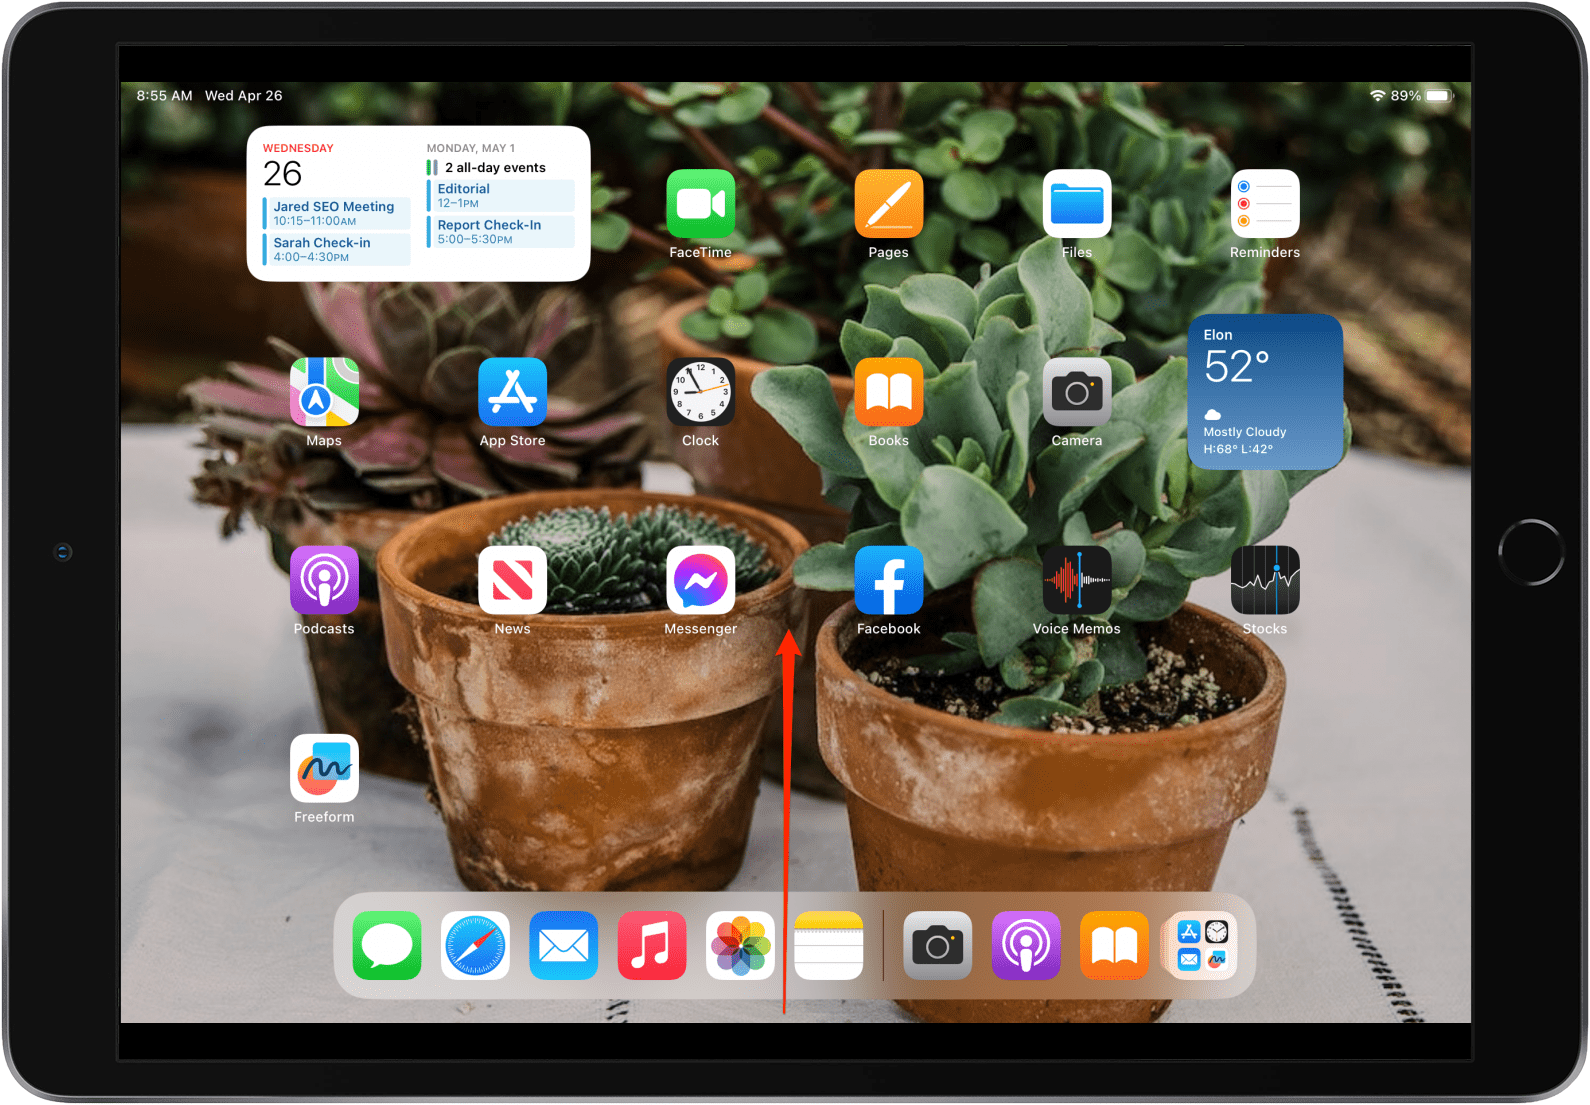
- Use four fingers to swipe left or right. This allows you to slide between active applications without opening the multitasking bar. Place four fingers on the screen and "turn the page."
- Swipe left or right from the bottom of the screen using one finger. With this gesture, start from the left or right corner, and make a small arc across the bottom of the screen to switch between open applications. (This arc should be very slight, as swiping too high will open the App Switcher.)
![Swipe in a slight arc to switch between iPad apps.]()
Both of these gestures are great for shuffling between messages, documents, and open browser windows.
Use the App Switcher
The App Switcher is a useful shortcut to navigate between apps and clear out recently used apps. While the App Switcher exists on your iPhone in a slightly different format, it’s such a useful iPad feature that we’ve still chosen to cover it here.
- Open the App Switcher: Swipe up from the bottom of your screen to the middle of the screen.
![Swipe up from the bottom of your screen to open App Switcher.]()
- View all recently opened apps: If you’ve recently opened more than six apps, you can swipe left and right to view currently active or recent applications.
- Open an app: Tap one of the app windows to open it.
- Force quit an app: Swipe up on the app window to force quit it.
![Swipe up on an app window to close it.]()
- Exit App Switcher: Tap on the screen around the app windows.
Pro Tip: If an app isn’t functioning properly, try opening App Switcher and swiping up on the app window to force quit it. This won’t resolve all issues, but it is a great first troubleshooting step to fix buggy apps.
iPad Typing Tricks
These days, learning how to type faster is really about learning how to type smarter. Whether you’re using the on-screen keyboard or an external keyboard connected via Bluetooth, you can make use of simple settings and shortcuts to write text with fewer taps on your keyboard. Let's get started!
Typing Tricks for the On-Screen Keyboard
Using the iPad’s on-screen keyboard can be a challenge at first. And in fact, if you plan to use your iPad for any heavy word processing, I recommend buying a Bluetooth keyboard case instead. However, the on-screen keyboard works well for basic typing tasks like writing emails and texts, especially if you employ some simple typing tricks. Here are some of my favorite on-screen keyboard shortcuts.
Tip No. 1: Enable Spell-Check and Auto-Corrections
My biggest piece of advice is to type fast and edit later. If you have autocorrect enabled, your device can often figure out what you were trying to type and make the corrections for you as you go. To enable spell-check, open Settings, tap General, tap Keyboards, and make sure Auto-Capitalization, Auto-Correction, and Check Spelling are enabled.
Tip No. 2: Insert a Period from Your Character Keyboard
You don’t even need to slow down to type periods. If you double-tap the spacebar at the end of a sentence, it will insert a period and start a new sentence with a capital letter. If this tip isn’t working, open Settings, tap General, tap Keyboard, and make sure the “.” Shortcut toggle is enabled.
Tip No. 3: Swipe Down to Access Special Keys
When you look at your keyboard, you will notice that each letter on the keyboard has a number or punctuation mark associated with it. So instead of having to tap the number icon next to the Space bar to access a whole new keyboard for these options, you can swipe down on a key and release it to enter the secondary option and then continue typing. For example, if I swipe down on the ‘d’ key and release, I can enter a dollar symbol without leaving my characters keyboard.
Tip No. 4: Set Caps Lock
When I want to celebrate with friends (or communicate an important point), setting the caps lock on my iPad reduces the number of taps on my keyboard. To set Caps Lock, simply double-tap the Shift button on your keyboard. Tap your capitalized characters, then tap the Shift button one more time to disable Caps Lock.
This shortcut is enabled by default; however, if it isn't working, open Settings, tap General, tap Keyboard, and tap the toggle next to Enable Caps Lock. The toggle will be green and to the right when enabled, and now the shortcut above will work.
Tip No. 5: Select Words with Predictive Text
With predictive text, you can see word and phrase suggestions at the top of the keyboard. These are words your iPad predicts you will type next, based on your past text conversations, writing style, and the websites you visit on your device. Using predictive text, you can select an entire word, instead of typing your message character by character.
To use Predictive Text, start typing your message. As you see a word suggested above your keyboard, tap to add it to your message. If you don't see the word you want, tap the first few characters of the word, and it will likely appear.
This shortcut is enabled by default; however, if word options are not displayed at the top of your keyboard, open Settings, tap General, tap Keyboard, and tap the toggle next to Predictive. The toggle will be green and to the right when enabled.
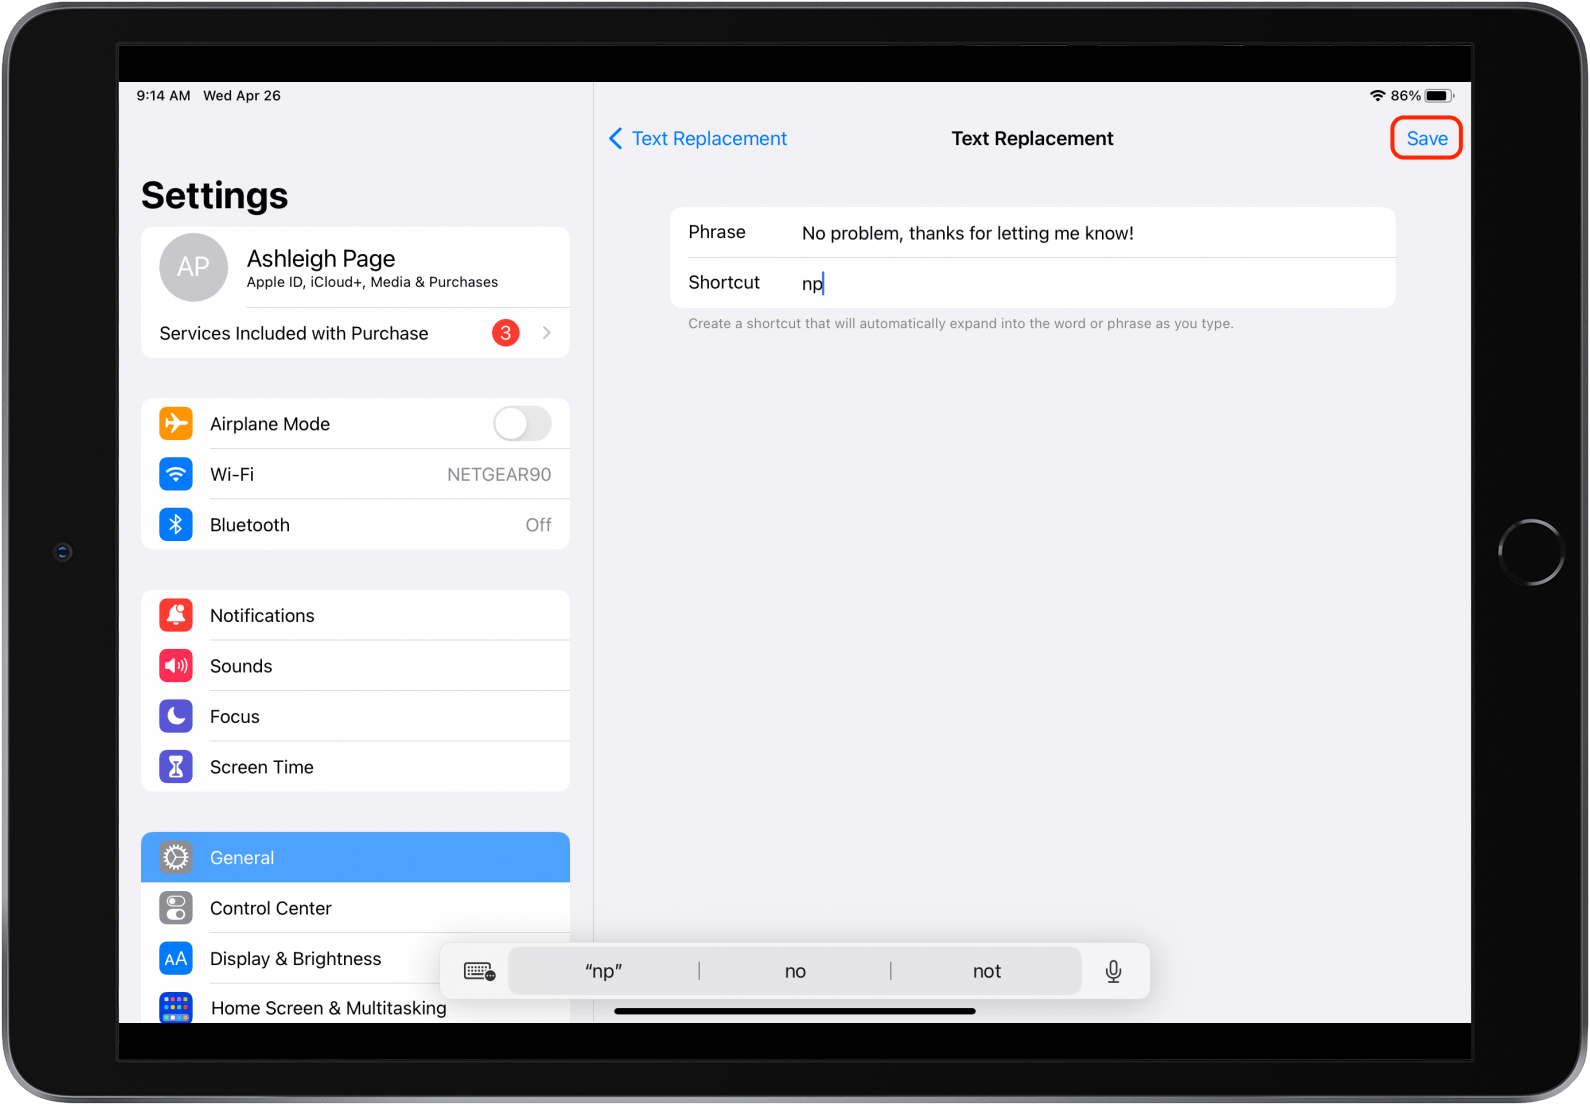
Tip No. 6: Set Up Text Replacement Shortcuts
With this fast typing tip, you will be setting up shortcuts for phrases you often use. For example, I have a text replacement shortcut set up on my phone, so when I type "5min" and tap the spacebar, my iPad replaces this with "I'll be there in five minutes." Here's how to set up a text replacement shortcut.
- Open the Settings app and tap General.
- Tap Keyboard and select Text Replacement.
![Tap Text Replacement.]()
- Tap the plus icon to add a new shortcut.
![Tap the plus icon.]()
- In the Phrase field, tap the words you want to create a shortcut for.
- In the Shortcut field, tap the characters that will represent your shortcut.
- Tap Save.
![Enter shortcuts and tap Save.]()
Now whenever you type your shortcut characters and hit the spacebar, the text will be replaced with your phrase. Add text replacement shortcuts for any commonly used phrases, and before you know it, you'll be sending texts more efficiently than you thought possible!
Typing Tricks for External Keyboards
Keyboard shortcuts are great for completing common tasks in a second. On your iPad, you have universal keyboard shortcuts (commands that work in any app) and app-specific keyboard shortcuts. These keyboard commands are making it easier than ever to navigate and multitask. Here, we’ll share how to view universal and app-specific iPad keyboard shortcuts. We’ve also created a list of the most useful keyboard shortcuts to help you get started.
View a List of Global Keyboard Shortcuts
On your Apple external keyboard, you’ll see an icon that looks like a globe. Pressing the Globe key will allow you to view universal keyboard shortcuts, which are split into four main categories: System, Multitasking, Split View, and Slide Over.
What If Your Keyboard Doesn’t Have a Globe Key?
If you have a non-Apple keyboard, you may not have a Globe key to make use of the latest universal shortcuts.
In this case, you can assign a key in Settings to take the place of the Globe key. Here’s how:
- Open Settings, tap General, select Keyboard, and tap Hardware Keyboard.
![Select Hardware Keyboard.]()
- Tap the Modifier Keys option at the bottom of the screen.
![Select Modifier keys.]()
- In this case, I’ll choose to select the Option key as my replacement key.
![Select Option key.]()
- Tap Globe.
![Tap Globe key to set it as the replacement.]()
Now when I want to execute a universal command, this key will take the place of the Globe key. For example, if I want to return to the Home Screen (normally Globe + H) I will instead type Option + H.
General Keyboard Shortcuts
- Command + Space: Open Spotlight Search.
- Space: Pressing the space bar allows you to scroll down a page.
- Command + H or Globe + H: Return to the Home Screen.
- Command + F: Search for a specific word or phrase.
- Globe + C: Open the Control Center.
- Globe + N: Open the Notification Center.
- Globe + Left Arrow: Switch to the next app.
- Globe + Right Arrow: Switch to the previous app.
Using the Apple Pencil
The Apple Pencil is incredibly useful for tasks that require more precision than your finger yet more flexibility than a keyboard—think old-fashioned note-taking, painting, signing electronic documents, and playing games.
The Apple Pencil excels at all of this, with sensors that can detect position, force, and tilt. Much like an actual pencil, a light touch gives you a lighter stroke, and harder pressure makes a heavier stroke. It has amazingly low latency, meaning there’s no noticeable lag time between when you move the Pencil and when the markings appear on the screen.
How to Draw with the Apple Pencil
The Apple Pencil tip is pressure-sensitive, which is especially helpful for any app that allows for drawing (such as Notes). With less pressure, you can draw thinner lines or lighter strokes of color. As you press down on the Apple Pencil tip, the lines will become thicker and the colors more opaque. The whole tip (also referred to as a nib or cone) is usable for your creative endeavors.
Try tilting the Apple Pencil, and you'll see the side of the tip works well for shading, much like a regular coloring tool. As you use the Apple Pencil, you'll notice it seamlessly goes from art tool to stylus. You can alternate between working on your project and tapping on your iPad with the Apple Pencil to open menus or access multitasking features like Slide Over or Split View.
If you're using an Apple Pencil 2, this accessory has an additional feature the original Apple Pencil lacks. You can customize the settings of the Apple Pencil 2 so that when you double-tap the lower part of the Apple Pencil 2 barrel (above the tip), it will toggle between tools within an app. For example, within the Notes app, you can set the double-tap to toggle between a drawing tool and the eraser. Within other apps, the double-tap can also be used for actions such as opening a color palette or opacity menu.
How to Use Scribble with Your Apple Pencil
Scribble is a powerful Apple Pencil function available on iPads with iPadOS 14 or later installed. With Scribble, you can write by hand in any text field and your iPad will automatically convert your handwriting into typed text. If you’re a person who prefers to write by hand, this could be a great alternative. You can use Scribble on your iPad in almost any text field, including Messages, Mail, Safari, or Facebook.
Enabling Scribble
To check if Scribble is enabled, open Settings, tap Apple Pencil, and make sure Scribble is toggled on. (When Scribble is enabled, the toggle will be green and to the right.)
Writing Messages
You can text Scribble by using it to write a text in the Messages app:
- Start a new message. Then tap in the text field with your Apple Pencil and begin writing.
- Your iPad will automatically translate your handwriting into typed text.
![Use scribble on iPad.]()
iPad Multitasking Features
Features such as Slide Over and Split View are excellent tried-and-true iPad multitasking interfaces. However, iPadOS 16’s new feature called Stage Manager will help you take your productivity to new heights! We’ll go over all of these features below, but first, there are some prerequisites for you to be aware of.
- To make use of Split View, you need an iPad Pro, iPad (5th generation or later), iPad Air 2 or later, or iPad mini 4 and later.
- For Slide Over, you will need an iPad Pro, iPad (5th generation or later), iPad Air 2 or later, or iPad mini 4 or later.
- Stage Manager is only available on M1 iPads: the 5th generation iPad Pro or later and the 5th generation iPad Air or later.
Split View
Split View is an incredibly useful multitasking feature, allowing you to use two apps simultaneously whether you’re in horizontal or vertical screen orientation.
Which apps can I use Split View with?
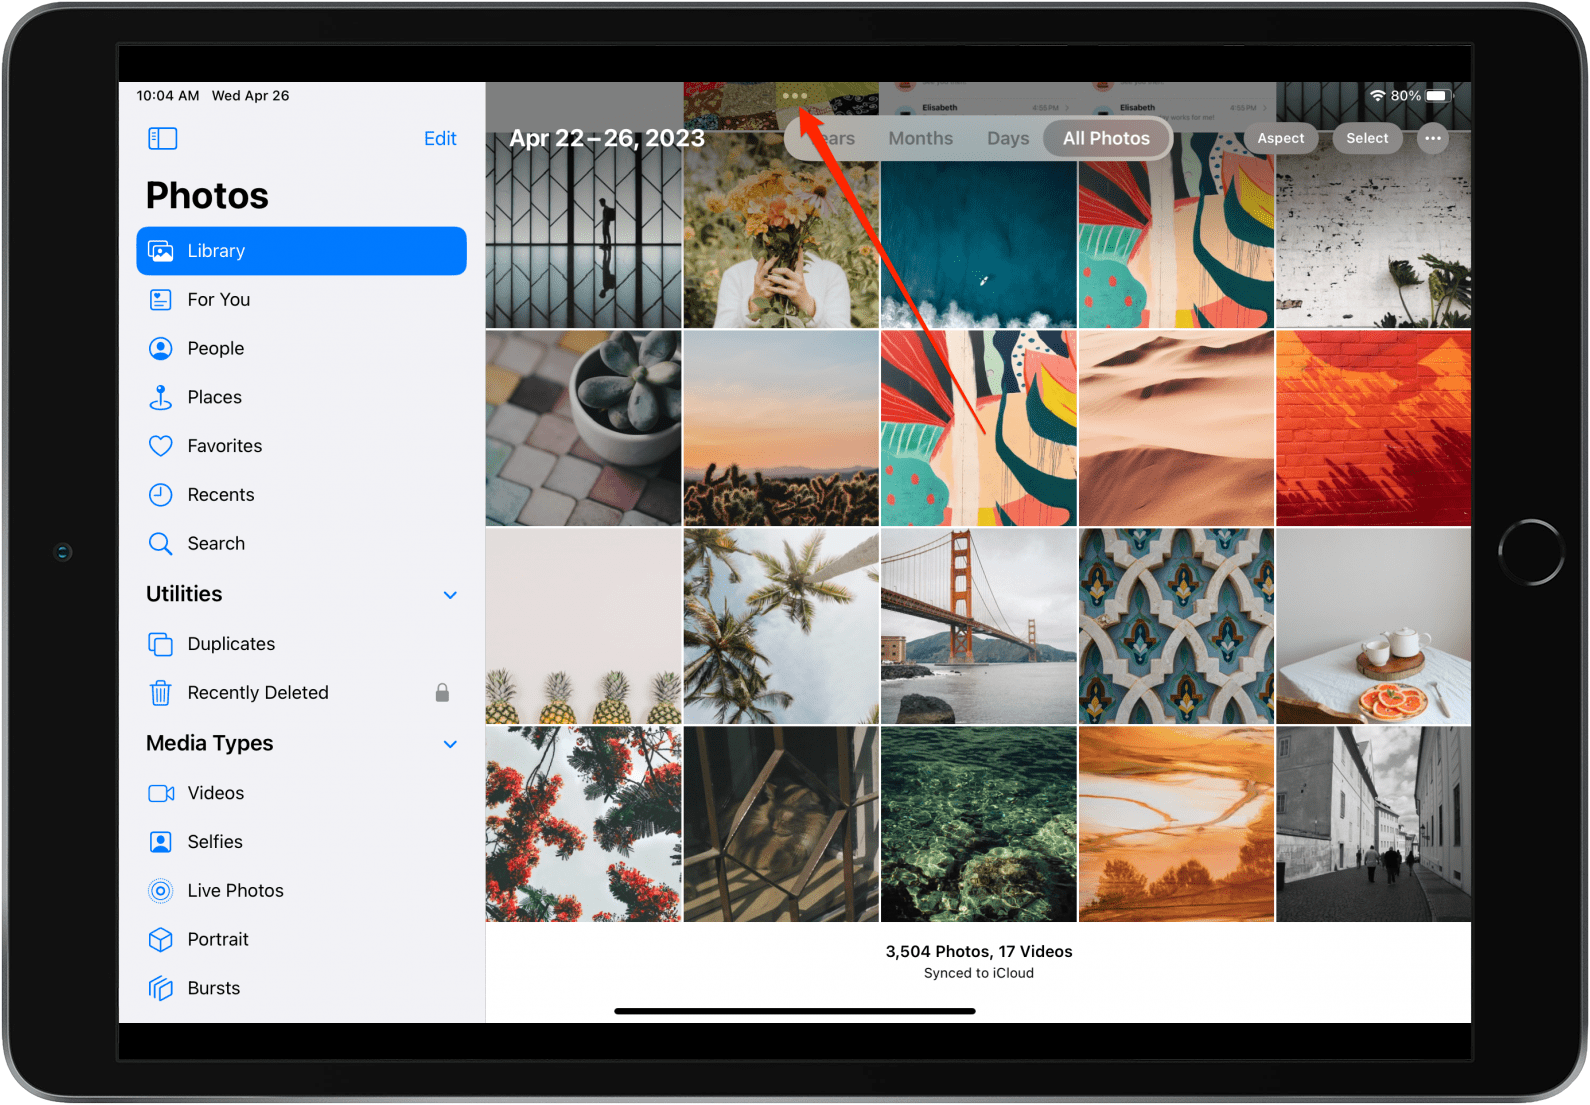
You can use Split View with most of Apple’s stock apps and with many popular third-party apps, such as the Microsoft Office apps for iPad. When an app is compatible with Split View, you’ll see three gray dots at the top of the screen. This is the Multitasking icon and is the key to making the most of this feature.
Open Split View
Let’s dive into how to use Split View!
- Open the first app you want to use. If the app is compatible with Split View or Slide Over, you’ll see the Multitasking icon at the top of the screen. Tap this icon.
![Tap Multitasking icon.]()
- Tap Split View. Your current app will slide to the side, and you can select your second app from the Home Screen. Both apps will now be displayed in Split View.
![Tap Split View.]()
- Once in Split View, you can press the Multitasking icon on either app and drag it to switch the apps’ positions.
![Drag Multitasking icon to switch window location.]()
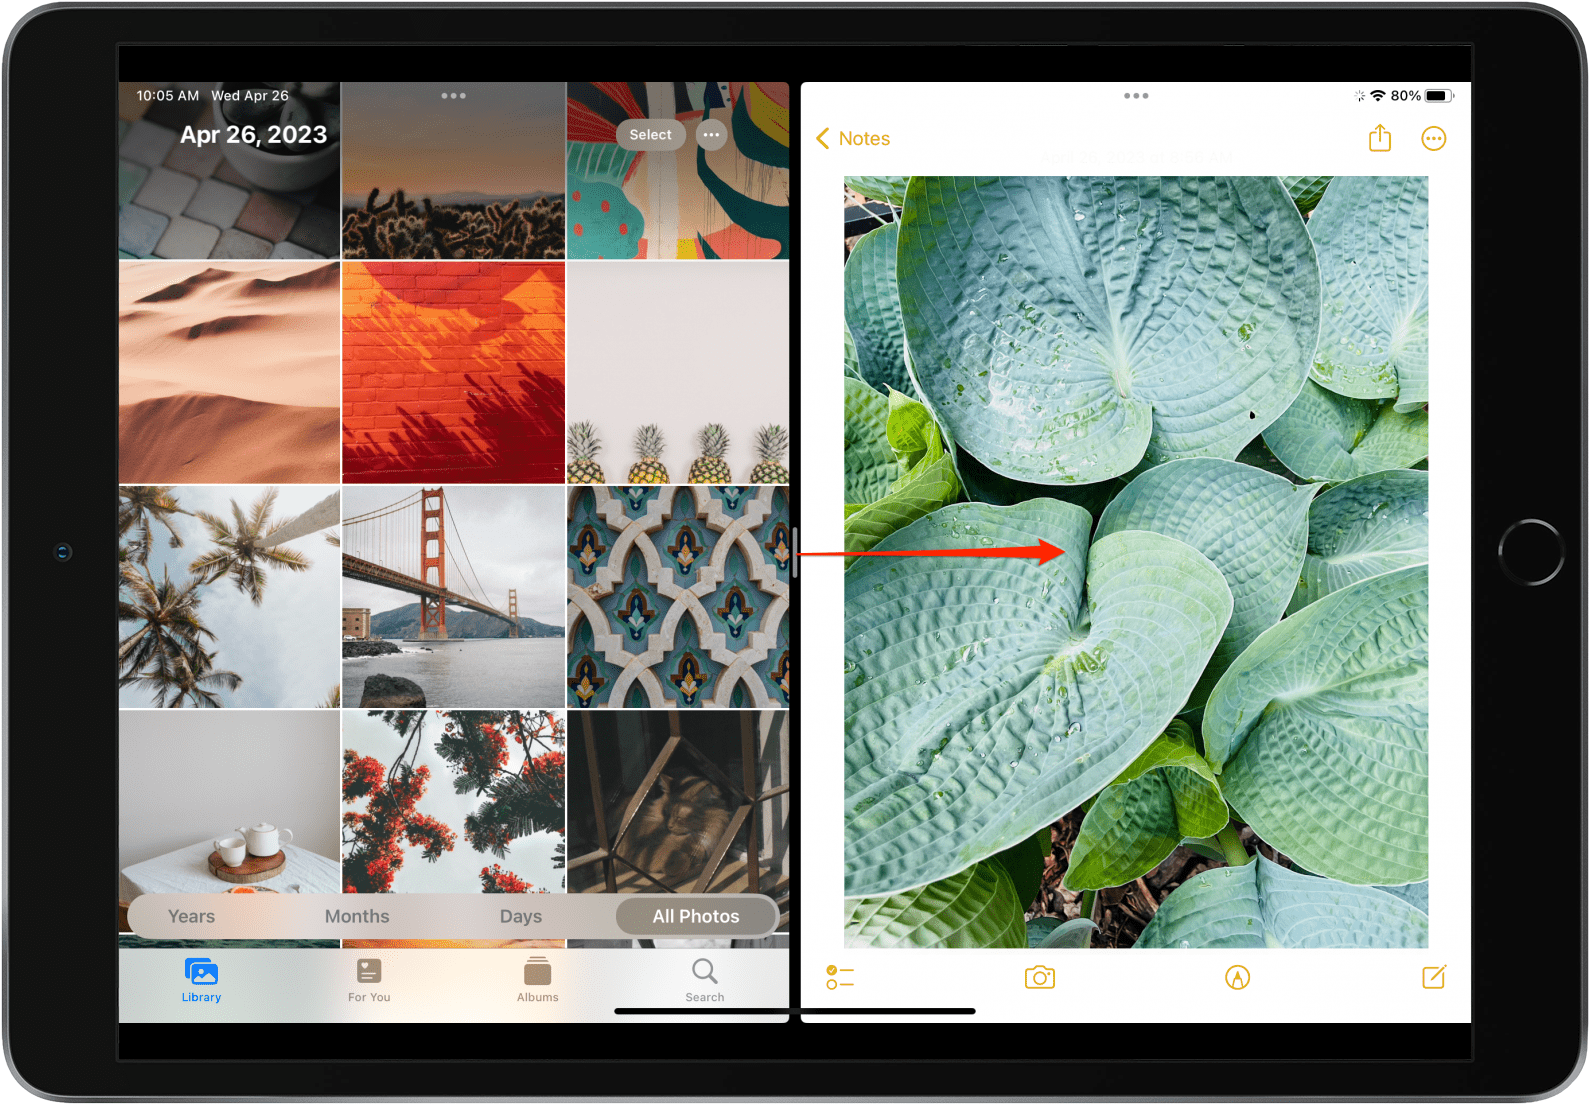
- You can also tap and drag the divider in the middle of your screen to adjust the width of your Safari windows and allocate more screen space to one of the apps.
![Drag divider line to resize Split View window on iPad.]()
- To return to the single window viewing mode, tap the Multitasking icon and select Full Screen or Close.
![Tap Close to exit Split View.]()
Pro Tip: Another easy way to close Split View is to drag the divider to the edge of the screen over the app you wish to close.
Slide Over
Unlike Split View (which divides your screen between two apps), Slide Over displays a primary app in full-screen mode and a secondary app in a small floating window on the left or right side of the screen. This view is especially useful for taking notes while referencing information in another app! You can use Slide Over with most of Apple’s stock apps and with many popular third-party apps, such as the Microsoft Office apps for iPad. When an app is compatible with Slide Over, you’ll see the Multitasking icon (three gray dots) at the top of the screen.
Open Slide Over
To access and use Slide Over, follow the steps below.
- Open the first app you want to use. Tap the Multitasking icon at the top of the screen.
- Tap Slide Over. Your current app will slide to the side, and you can tap the app you'd like to open behind your Slide Over window.
![Tap Slide Over.]()
- Another way to open Slide Over is to open your main app, then drag a second app from the Dock onto the screen.
![Drag app onto screen to open Slide Over window.]()
- You can move the second app around your screen by placing your finger on the Multitasking icon at the top and dragging it to the left or right.
![Drag gray dots to move Slide Over window.]()
- To hide the Slide Over window, swipe to the edge of your iPad screen. The app will be minimized behind a gray arrow at the side of your screen.
![Drag the gray arrow to open Slide Over window.]()
- Swipe from the gray arrow across the screen to show the Slide Over window again. If the gray arrow has disappeared, you can still get the Slide Over app back by swiping from the side of the screen.
- To exit Slide Over, tap the Multitasking icon and select Full Screen or Close.
![Tap Close to exit multitasking on iPad.]()
Additional Resource: If you’d like to learn more about multitasking features, check out our article covering the various iPad multitasking features, like Picture in Picture.
Stage Manager (M1 iPads Only)
Apple’s new multitasking solution for iPad users, Stage Manager, organizes open windows and apps so you can see everything you’re working on with a single glance while still focusing on a specific app or task. The currently open window is displayed prominently in the center, and other open apps or windows appear on the left. This allows you to switch between open apps or windows super quickly and easily. You can also group windows when working on specific tasks or projects that require different apps. Stage Manager also works with other macOS windowing tools, like Mission Control and Spaces.
Enable Stage Manager on Your iPad
On an M1 iPad running iPadOS 16 or iPadOS 17, follow the steps below to turn on Stage Manager:
- Pull down the Control Center menu from the top right corner of your screen.
![Open Control Center to enable iPad Stage Manager.]()
- Tap the Stage Manager button. The button will look like three little squares next to one big square.
![Enable Stage Manager on iPad.]()
- If you want to change the Stage Manager layout, long press the Stage Manager icon. This allows you to either show or hide the Recent Apps sidebar and the iPad’s Dock.
![Tap check marks to show recent apps or dock.]()
Now anytime you want to use Stage Manager, you can quickly toggle it on and off with one tap in the Control Center.
Using Stage Manager on Your iPad
Here are a few quick tips to get the most out of Stage Manager:
- We recommend using Stage Manager in landscape mode (horizontally).
Why? When the iPad is in Portrait mode, you won’t be able to see open apps in the sidebar navigation unless you tap to display it. - You can always return to your iPad’s Home Screen by swiping up as you normally would. So don’t worry about getting trapped in the Stage Manager view!
Let’s get into how to use this cool new interface.
Resizing Windows
Once Stage Manager is turned on, you will see a curved line in the bottom right corner of your apps. If you tap and drag the white corner, you can adjust the size of a window.
There will be various different sizes depending on the app you’re working within. For instance, you have more options in terms of resizing the window in the Safari app than you do in the Netflix app. This is because the app size is optimized to give you the best viewing experience.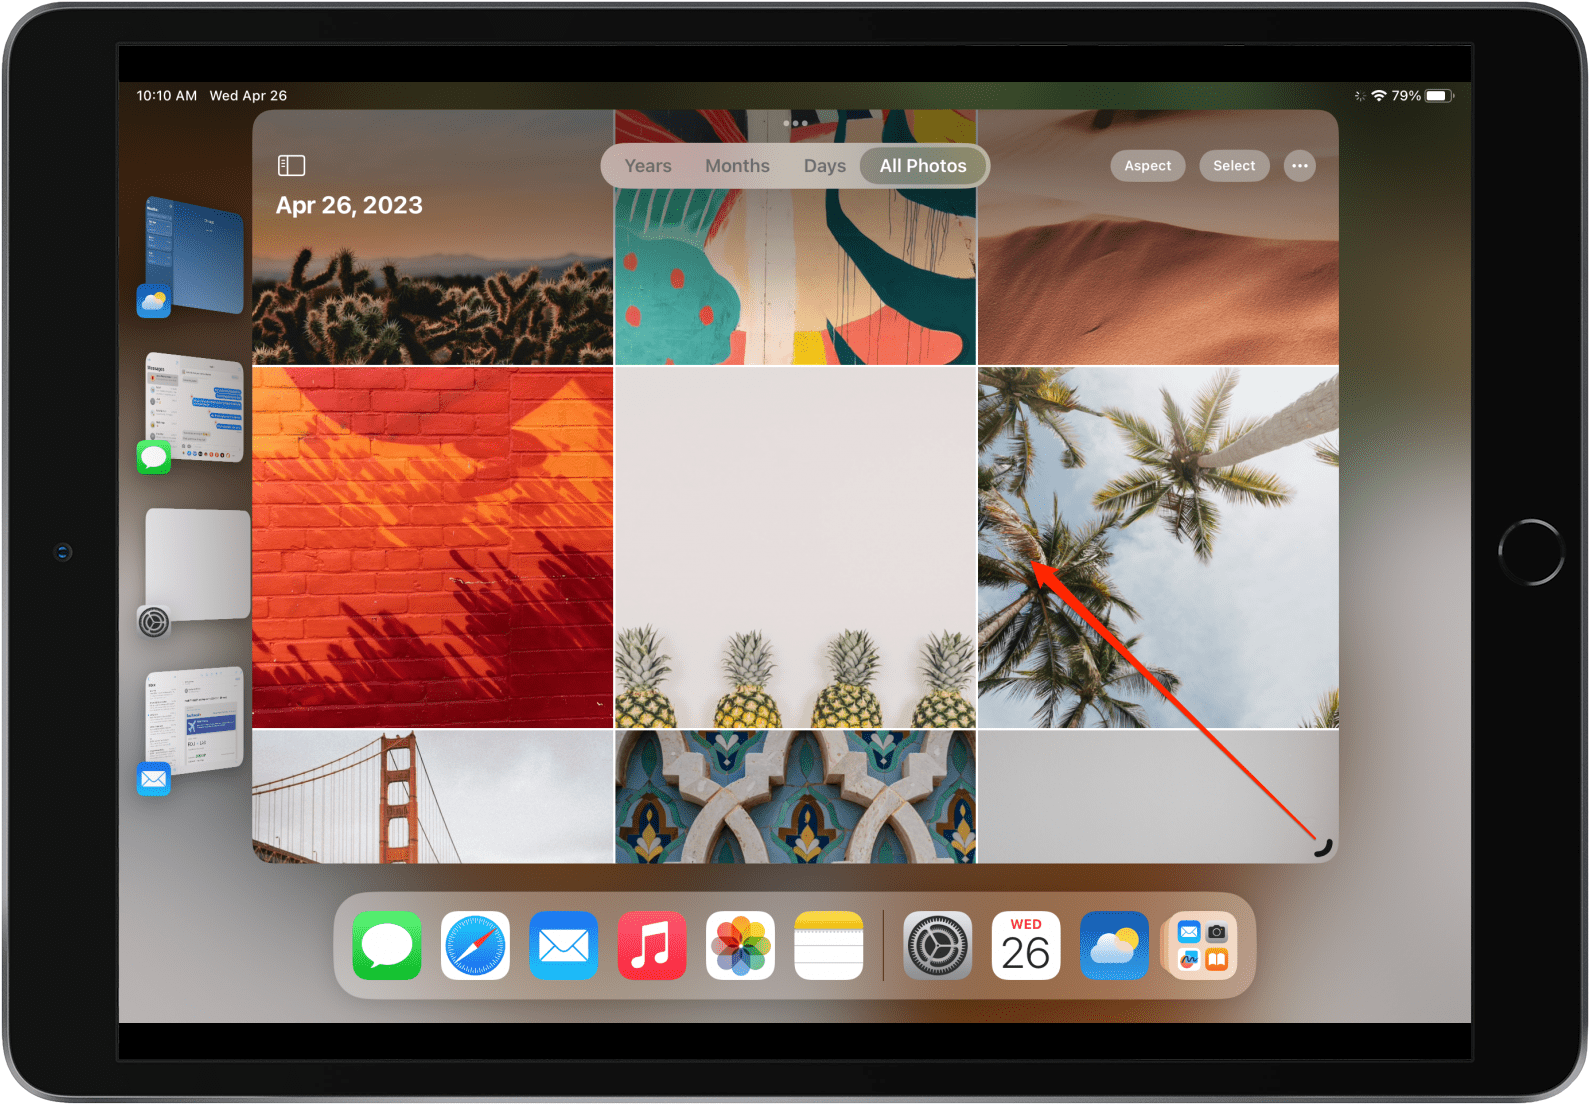
Switching between Windows in Stage Manager
Stage Manager is all about making multitasking and switching between apps fast and easy. The way to switch windows with Stage Manager is to use the sidebar to quickly store and switch between apps.
- To switch between windows in separate groups from the sidebar, open any app on your iPad.
- Then, if you are holding your iPad vertically, swipe right from the left side of the screen to reveal the sidebar. If you’re using your iPad horizontally, the sidebar will be automatically displayed.
![Swipe from the left-hand side of the screen to view Recent apps.]()
- The sidebar displays your four most recently used apps. To switch between any of these apps, just tap the one you'd like to switch to.
![Tap an app on the sidebar to open it.]()
Now the app you selected will be your primary workspace. You can switch back and forth between any of the open apps in your sidebar with just a tap.


